I saw a real knife like this online and thought what a cool design. So I set out to make an equivalent one but out of plastic hoping it would be durable enough to be functional. And, it is…

There are at least 3 things that are critical to the durability and therefore functionality of the knife. They are blade geometry, material selection (for the blade) and speed of use of the knife.

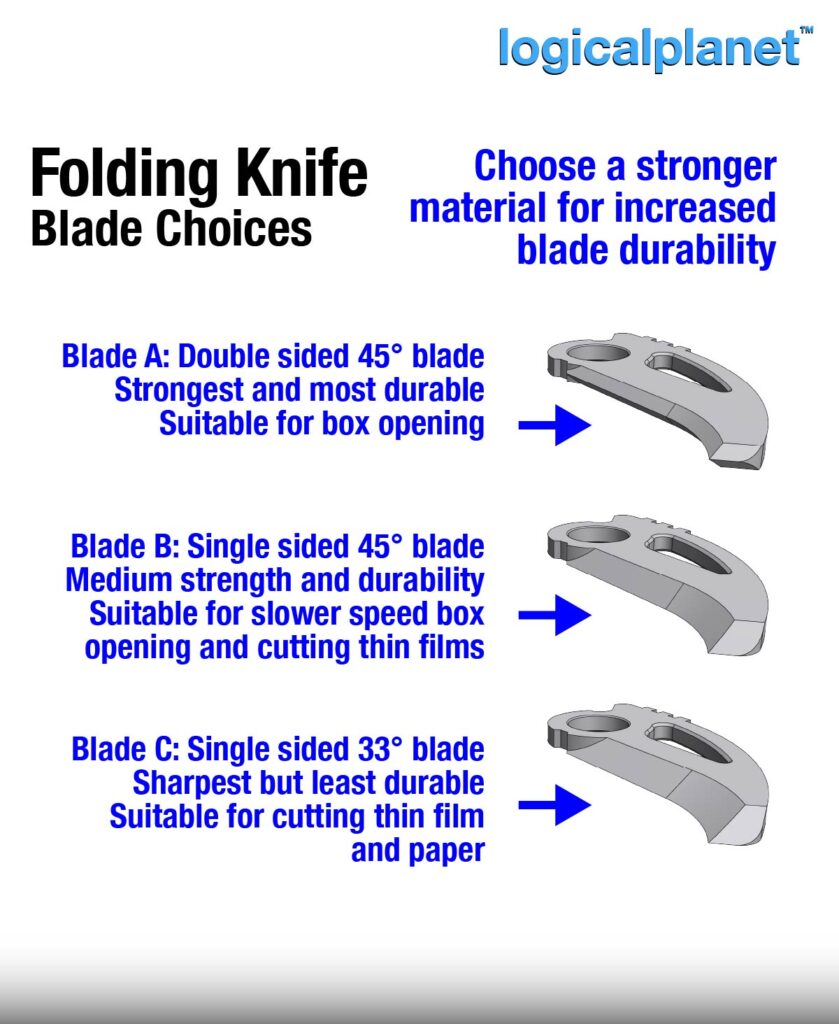
The blade geometry is quite interesting. A sharper blade edge is obviously nicer to use but at the same time is inherently less durable. So I have included 3 versions (geometries) you can select from depending on how you want to use the knife. I have been using the double-sided 45-degree edged blade the most and very successfully. I have also included a single-sided 45-degree edge and a single-sided 33-degree edge. The 33-degree edge is so fine that it can only be used for cutting thin films when a strong filament is used. But I wonder how long it will be before we can 3d print in metal or metal-like materials. Which material you plan to use as well as how you plan to use the knife also plays into the blade selection.

Material selection is pretty straightforward… you want to use the strongest and highest temperature filament you have. In my case, I used an ABS (actually eSun ABS+) and it was quite successful so I have not tried anything stronger. I do have a few different carbon fibre-enforced materials that I have never used and thought I would try them for this but so far I have not. But that might be another way to improve the durability and strength of the blade. As I noted above, if you can print with metal then that would obviously be the best solution.
Lastly, how you plan to use the knife is more important than you might initially think. Of course, a plastic knife is not a great solution for most knife applications. But cutting relatively thin materials such as box tape to open packages received from online shopping or opening envelopes is quite suitable. In fact, cutting rolls of thin films like plastics and paper is also another good application. However, the speed at which you use the blade is also a major deciding factor in the knife’s appropriateness. Cutting through a box at full speed will melt PLA for sure and the knife will only survive a few uses regardless of the blade geometry.

The entire knife prints as 3 pieces. The blade and 2 halves make up the handle. One of the halves has an integrated compliant spring which provides the safety detent for the blade in the open and closed position.
Printing
Functional designs (such as this one) generally require more strength than non-functional designs and more strength than the typical default slicer settings provide, so please review your slicer settings carefully.
This product was designed for a 0.4mm nozzle, a 0.2mm layer height and the following settings:
- Wall Line Count = 4 ( 4 x 0.4mm = 1.6mm walls )
- Top and Bottom Layer Count = 5 ( 5 x 0.2mm = 1.0mm top and bottom )
- Infill = 40%, Cubic
- Ironing = ON, Everywhere (to assist in separating the layer components)
- Ironing = OFF (not needed)
- Support = All required support is designed into this product
- Brim = NO (a brim can complicate details of print-in-place parts and parts printed close together – If you have to use a brim, set it to “outside only”)
- MATERIAL: PETG recommended (any material should work fine)
- PRINT ORIENTATION:

Assembly Notes
No post-print processing is required. To assemble it, simply align the parts as shown and press them together.


Leave a Reply